|
DISCOUNT
Garment Racks & Store Fixtures |

Wholesale Pricing! |

FAST! Shipping |

No Sales Tax!* |

Top Quality Fixtures! |
|
sales@garment-racks-store-fixtures.com Questions?: Email Us! |
Order Toll Free: (800) 448-8762 |
Garment & Clothing Racks
 Rolling Racks
  Arm Racks
  Slatwall Panels
  Slatwall Hardware
  Slatwall Fixtures
  Gridwall Panels
  Gridwall Hardware
  Wall Fixtures
  Shelves
  Acrylic Displays
  Wire Displays
|
Garment Racks Slatwall Gridwall |
Slatwall Installation TechniquesWe recommend professional installation of Slatwall Panels, by a licensed and insured General Commercial Contractor. However, if you chose to install panels yourself, following are some helpful tips. Always consult your local and regional building codes and obtain the proper permits. Preparation
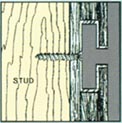
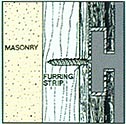
Cutting Panels Slatwall panels can be cut very easily. For straight cuts use a table saw and cut the panel face UP, or use a circular (skil) saw and cut the panel face DOWN. Use a sharp blade with 60-80 teeth. For irregular shaped cuts, use a jig saw with a medium blade, approximatly 10 teeth per inch. Installation Drill screws THROUGH the Slatwall grooves INTO the studs. It will be necessary to locate and mark the lateral position of the wall studs prior to installation. Use a minimum of 24 screws, spaced evenly for each panel. For a more permanent installation, also use a general purpose panel adhesive, applied to the back of each slatwall panel. If your slatwall panel has mil aluminum extrusions (groove inserts), use 2 1/2" to 3", #6 or larger, pan head screws. It will be necessary to first pre-drill a pilot hole through the groove insert. Masonry Walls
|
Garment & Clothing Racks
© Copyright 2004 - 2013.
All content included on this site, such as text, graphics, logos, display button icons, fixture images, and software
is protected by United States and International Copyright laws.
All rights reserved.


